I knew I wasn't going to be able to make an exact copy. My skills just aren't there and I needed something a little more practical skirt wise (skirt train culture is extinct; either that or they were always getting stepped on and people just dealt with it). It was difficult finding photos of the back of this dress. The few I did find weren't at the best angles nor with the best lighting. Those challenges aside I decided to jump in and give it a go. Here's my version:
I used three patterns for this look with various modifications. The bodice is a lightly modified Truly Victorian
1877 Two Tone Bodice. The skirt is a combination of
1878 Long Draped Overskirt and the
1878 Fantail Skirt. I also made
1879 Petticoat with Detachable Train minus the train (I ran out of time but will be making the train up later).
The bodice modifications were simple enough. I changed it to look like a vest front and totally skipped the collar. I couldn't find the black/white lace like on the original but I quite liked how my neckline looked while wearing it. It was a bit of a trial
to add the lace stripes. I had to trim the lace down and mark out on the pieces where they went. And of course a few would move while I was sewing. I have a few I need to go back and line up better (but that will have to wait for another day as I ran out of
time for adjustments)
The skirt itself was a beast to do. I started with a complete version of the fantail skirt as the base. I did not sew up the side seams, but rather keep the front and back pieces separate while I did the other stages of the dress.
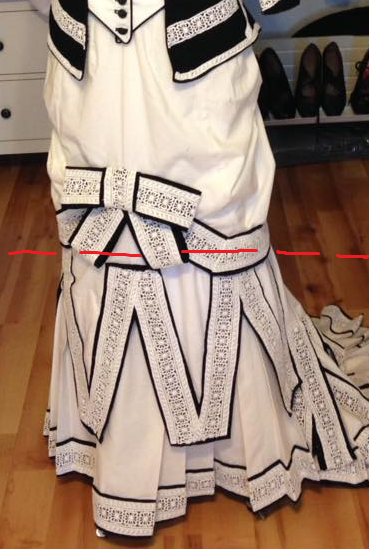
My first step was to add the kick pleats at the front of the skirt. I made them as high as my knee (my reasoning was I wanted them high enough to fill out from under the triangle layer). They are taller than the pleats that went around the tail in the back
of the skirt. The red dotted line in the photo is where those pleats were attached to front of the base skirt
After that came the triangle layer. I wanted to make sure the triangle were of equal proportions across the front. I wish I could explain my math for this step but... I'll do my best. First I figured cut out a piece of fabric in the same shape as that portion
of the skirt on the base (leaving a few extra inches at the top where I knew I would be sewing it down). I then determined the center front and measured from there to the seam allowance. Using the width of black border, I figured out how wide the base of each
triangle would be, how many I could fit on each side of layer, and that's how I determined how many points there would be. Probably NOT clear at all. I promise my math was not exact. The dotted line in the next photo is where I attached this layer to the base
skirt:

The top portion of the front of the skirt is the long draped overskirt front and side front pieces only and shortened considerably. I shaped out one small triangle in the front and trimmed with a bow. I ended up not doing the cording as seen in the original.
My overskirt was much shorter than the original appears to be (the proportions of my skirt layers clearly different from the original at this point), and I thought it wouldn't look right.
The back of the skirt was only two layers attached to the base. First attached was a shorted version of the front kick pleats. The ended right where the triangles opened up. I had a bit of trouble attaching them. The back of the skirt is rounded and my pleats
weren't so I ended up putting darts in my pleats at certain locations to make them lay as they should. If anyone has a better trick on how to add straight pleats to a curve please teach me! The red dotted line is where I sewed down the bottom row of pleats.

Finally I made the top layer of the back of the skirt. It's just another full back of the fantail, trimmed down to the triangles and shortened so it didn't totally cover the pleats at the bottom. The black bow in the back is tacked in place to help the skirt
hold it's place.
Once all the layers front and back were done I sewed up the side seams and added the waistband. The skirt is heavy, but it's full and it was super fun to wear. It definitely need the detachable train that I did not have time to make. I'm really looking forward
to wearing this again!
|