Wednesday, December 3, 2014

Simplicity 2589

Yet another project made from out of print patterns. These just very recently went out of print, and you can still snag them for about $5 each. I *highly* encourage anyone that even thinks they might one day remotely consider making this dress to get them.

I'll start with the outer layer of the costume (it's part I like best). It was a fun gown to wear, and I can see the allure of making more after spending a day in one.


TIME: Roughly 35 hours for all outer layer items. My arch nemesis, hand sewing, was required for certain parts of this costume. The hems and fore sleeves required the most hand sewing, and it was necessary for all that cartridge pleating on the green portion of the dress. I hand sewed the hems because machine stitching would have been EXTREMELY visible on this fabric, and while I am not a purist by any means, I was trying to obtain a certain level of correct with my appearance.

This time also includes the hundreds of pearls, "jewels" and gold trim detail attached to to the dress and French hood. Those things were also hand sewn down. In retrospect I should have done the pearls before I added the felt backing to the forepart, but I wanted to make sure I had something finished I could wear vs. an embellished portion of a costume with nothing else attached to it. There is a small but growing benefit of the mass amounts of hand sewing I've been doing: getting better and ever so slightly faster.


Look at those tidy, tiny stitches!
GLORY IN THEM.


ALTERATIONS: I did make a few.

The forepart directions called for a ribbon waistband. It just didn't seem like a substantial enough way to secure so much fabric to me. So I made the skirt with a normal waist band.

I had to change the shoulder straps to this gown. If I had followed the pattern markings, the gown would have slipped off my shoulders. Seriously. I had to remove about two inches off the straps to get the gown to sit where it wouldn't fall off. I'm not the most busty of ladies, so I'm sure that had something to do with it. Also, since this is a pattern made for a large commercial company, I'm sure they go by the "easier to take in than let out" motto. This changed how the sleeves were attached. I have to gather the fabric to get them to fit the opening. I have no idea if gathered sleeves are period correct or not, but I am not skilled enough to fool around with pattern scaling.

After some advice and research, I change the placement of the veil on the hood. The pattern called for it to be attached at the bottom part of the hood. It didn't seem right. It would have looked deflated. So it was moved to the top of the hood and flowed much better.
 
I did not use the gingham for the cartridge pleating. I marked my fabric with a chalk pencil and made the pleats that way. I didn't have any gingham on hand and I didn't feel like buying any.
 
The length of this dress had to be shortened. I'm 5'3" and I would have been tripping all over.

EASE OF INSTRUCTIONS: Very good instructions are included in this pattern. I had a bit of trouble with the steps involving how to turn under the fabric to create the pleating in the front. I'm not sure if how I did it was actually what I was supposed to do, or it just worked out for me.

FUN FACT: it is entirely possible to ride an elephant while wearing this dress.

My "sewing room" is in a fair state of chaos right now, but I'm hoping that once trim is down and the closet installed, I can unpack this costume and share more detailed photos of it.

Friday, October 17, 2014

a sewing room of my very own

In very exciting news, my husband and I recently purchased our very first home (yay!). We had outgrown our one bedroom apartment a while ago, and had started the official house hunt last spring.

The house needed to have space enough to accommodate both of our hobbies. My husband is actually a professional model maker, and that has spilled over into his home life of building hundreds of little things that for some reason need lots of big things to make them. Which is sort of funny because I make life sized things, and the machines to do that are quite small.

We made an agreement that he would take over the basement as his work space of any house we did buy, and lucky for him (and me) the basement of our new home is the full length and width of the house. So he has plenty of room.

Which means I get to have an ENTIRE ROOM just for me! Very very very excited about this! My old craft area was a corner and a dining room table. The prior owners of our home had enclosed the carport between the main house and the garage and used it as a dining room. Since the kitchen is an eat in, and there's only the two of us, we don't need to dedicate that much space to food.

The room is a little narrow (11 feet across) but very deep.


What? A window for natural light?
 
 
Enjoying that they just put up some plywood over
 the old window and painted it.
 
Of course, since it's just an old carport there's no closet to speak of, and the walls are brick. I think that's kind of fun, giving it a warehouse/industrial feel to it. The carpets are gross (they don't look that bad in photos, but they are). The plan is to put down some faux wood flooring. I had thought about finishing the walls, but I think I'll loose too much space. The back wall in the second photo has an outlet about every foot or so; I'm thinking a L shaped desk for the sewing machine and serger.
 
Along a side wall I think something like this Stolmen system from Ikea would be great for costumes.


Plus an additional full length bar for more dresses.
 
 
I admit I am slightly hesitant about the everything exposed to everyone look, but some curtains would easily solve that problem. Storage would be needed for stuff like books, hats, and patterns. Again Ikea would come to the rescue with those cube shelves they sell.
 
The husband has promised to put together a cutting table for me (more Ikea shelves with a butchers block secured on top). I usually like dark wood and colors, but for sewing/crafting, I really think white and light is the way to go.

Odds are my space will look like a show room until the first project. Then it'll look like a nightmare. But a roomy, all mine nightmare. That I don't have to put away or clean up to eat dinner. 

shoe time!


American Duchess is having another shoe give away! Check it out for your chance to win!

Thursday, October 16, 2014

Done


The gown was completely finished and on time! Horray!
 
 
It was a great day at the fair (our original planned day had been rained out). I was very pleased with how the dress turned out, and will do a write up about the construction later. I thought I would finally share a photo of myself wearing something. 

Wednesday, October 8, 2014

Anne Boleyn Dress: COST

About four months ago six friends and I all decided to get together and go to the Pennsylvania Renaissance Faire as the six wives of Henry VIII. I nabbed Anne Boleyn as fast as I could.
This was a VERY big project for me. I have never done anything Tudor before. I researched what I could about Anne's style (her favorite color was green, her favorite gem were pearls, her style was "simple"). Unfortunately there don't seem to be any contemporary portraits of her.

I followed my usual style of using a commercial pattern. I'm just not at drafting skill yet. I used Simplicity 2589 and the companion undergarment pattern for everything except stays. For the stays I used the Elizabethan corset generator.  The Simplicity patterns are out of print, but still available for purchase on their site, as well as all over ebay and etsy.

Let me say now that this is probably the MOST expensive outfit I have yet made. I couldn't give the exact cost, but I will break it down as best I can. Amounts are approximate:
$80 - 9 yards of green velvet (purchased on super sale at Joann's, this color is no longer available there. I know I used the rare an elusive 60% off coupon for this purchase)
$5 - felt
$40 - gold and black silk for the forepart and foresleeves. (I ordered too much and have a bunch of left over)
$20 - faux pearls. I started pearling with a necklace I had purchased years ago that fell apart and I never restrung. Once I ran out I purchased 99 cent strands from Micheal's crafts in similar size and color.
$20 - bracelets taken apart for the black "jewels" on the neckline and foresleeves
$40 - cotton for the farthingale, inner sleeves, shift, bum roll
$15 - faux fur

This does not include some supplies I already had on hand. I have a never ending roll of twill tape I purchased from Jomars. I used it for bone casing. I think I paid $3 for the whole roll, and easily have another 500 yards on the roll after this project. I had fill for the bum roll (left over from the 1857 day dress bum pad). Hoop steel and connectors left over from my civil war ventures, as well as zip ties from 18th century projects Thread and notions also were on hand. The patterns had been purchased while they were still in print for $1 each.

All this put this project at about the $220 mark. If I had to pick up the supplies I didn't have on hand it would have probably cost about $250. Some of the cost does come down to my fabric choices. There are cheaper (and less annoying) fabrics than velvet and silk. I didn't need to embellish the dress. Nor did I need faux fur on the turn backs. I also didn't "need" to make this dress, so it's all relative!

More to come at a later time, hopefully with pictures!

Tuesday, August 5, 2014

wonky pattern matching is wonky

I've tried to pattern match this fabric on the back and side backs, and it continues to foil me. This is my best attempt thus far, and I'm still fairly displeased with it. I have, however, run out of fabric for these excessive attempts. So I have to accept this as is.


The right side back and back match fairly well.  My mess ups are far more obvious on the left side back. I'm hoping a lot of moving about will prevent anyone noticing it in person. I thought it would be easier to match since the pattern is not anywhere near as busy as others I have done in the past. HA! Oh well. At least my skirt panels match up!

Monday, July 28, 2014

the Anne Boleyn Project

I've been told lots of people like to have two projects going at one time. This way if they get bored of one or need a break, they can pull the other out and make progress there. It might explain why some costumers seem to bust out a new outfit every other day (or they're just super fast, maybe both).... I'm currently giving this method a try. The Regency day dress was a bit of a surprise, otherwise I wouldn't be juggling these two projects together.
 
A month or two ago a group of friends and I decided it would be fun to go to our local Ren Faire dressed as the 6 Wives of Henry VIII. As fate would have it, the faire is changing from Elizabeth to young Henry and Katherine this year (but that's just a weird coincidence).

I jumped at the chance to dress as Anne Boleyn. My interest in her began the first time I saw Anne of the Thousand Days staring Genevieve Bujold. Since then I've seen and read so many different portrayals of her. She's always been an iconic figure (good and/or bad) and I am so excited to be doing this.
 
 
There only seems to be one period portrait of her (which really is a late Elizabethan portrait). It's been said her favorite color was green and her favorite jewels were pearls. Her "B" necklace is another trademark I cannot leave out. Unfortunately I have blue eyes and pale skin (Anne was described as having black eyes and a darker complexion), but there's not much I can or will do about that (not tanning, thank you).
 
I'm going to be using Simplicity 2589 and 2621 for this project. My fabric choices are probably a little on the conservative side (but I'd rather make something a little more plan but correct then something all crazy and wrong). I'm using "hunter green" cotton velvet for the majority of the gown (which apparently Joann's no longer sells, glad I picked it up when I did). The forepart of the skirt and the foresleeves with be the black and gold silk damask (purchased at fabricguru.com). The folded back portion of the sleeves is going to be black faux fur. I found the "B" necklace on Amazon for $20 (with free shipping) which looks suspiciously like several "handmade" necklaces on Etsy selling for a little bit more.


If time and patience allows me, I plan to fancy up the foresleeves and forepart with pearls stitched on here and there (the most important thing is to make sure I have something to wear before obsessing over small details).  
 
I have started a little bit of sewing for this. It worked out I was able to make the chemise for a Historical Sew Fortnightly challenge (the challenge was "Under $10"). It's made of black and white striped cotton (I picked up 20 yards for $20 at an opera sale), and the pattern I picked  up for $1. I know the cotton isn't historically accurate, but no one is going to see it and I had to cut some budget corners somewhere (velvet is not cheap). 

It has a very, very wide neckline.

I've also finished the bum roll using scrap fabric and have started on the farthingale. I will not be using Simplicity's stay pattern. I already know I'm a bit short waisted, and a friend who had made it in the past found it very long. I tried her set on and it was digging into my sides. Also, the boning did not extend into the tabs at the bottom of the stays. Usually they do, which I believe is designed help take the weight of the clothing off of the waist and keep things from slipping down. I can't say all this with 100% authority, but it's my working assumption. So instead I will be using the Custom Corset Pattern Generator.

Fingers crossed I don't somehow sew the Regency bodice to the Tudor skirt....

Thursday, July 24, 2014

Regency day dress: beginning stages

Yet another Regency event has popped up, and I must sew! A friend is putting together a Regency Tea event. My only two current options are a wool day dress (sort of bad for August) or my sari evening gown (not so "tea" looking).

For prior events I have borrowed a dress from a friend, but I really feel like I'm taking advantage of that benefit. Once or twice, not a problem. Over 5 times? Probably starting to get a little annoying. And she's also going to this tea and *might* want to wear her own costumes. Weird, right?

I've already picked up my accessories, which I purchased from In the Long Run. I've ordered from her before, and have nothing but great things to say about her work. It's all very well made, looks perfect for the era, and arrives super quick.

I nabbed this festoon necklace, matching earrings and my same friend gave me the a matching bracelet (maybe a hint to start my own dress to go with it?)


Since I have this jewelry sitting around waiting to be worn, I thought now was as good a time as any to find some fabric to match it. I'm under the impression that white was very popular during Regency. If not white, then pastels. Soft, delicate, girly-girl colors and prints and everything that is so not me. I'm certainly not the most knowledgeable of Regency fashions, so please don't take my opinion as fact.

My assumption of white standing, I'm sure there was a color rebel or two during the time, and I want to channel them. But I also don't want my dress to look, well.... like a gag dress in Austenland. There's got to be a balance.

I found some fabric at a Joann's in the red tag section. I wasn't sure of it (in terms of Regency wear). I know it would be great for some 18th century looks, have seen it used for such, so I knew they had access to making fabric that looked like it. Is it the equivalent of someone today walking around in 1980's neon? Maybe, but someone could have done it and thought "damn I look stylin'" or whatever the slang Regency ladies used when they thought they looked good.

I can't say for certain why this is different from other floral prints that I would normally turn my nose up at. While it is feminine, something about it seems sturdy. Does anyone else apply such odd adjectives  to fabric designs? Maybe not sturdy, maybe practical is better.


I was hidden under some outdoor fabric until I could be purchased!
 

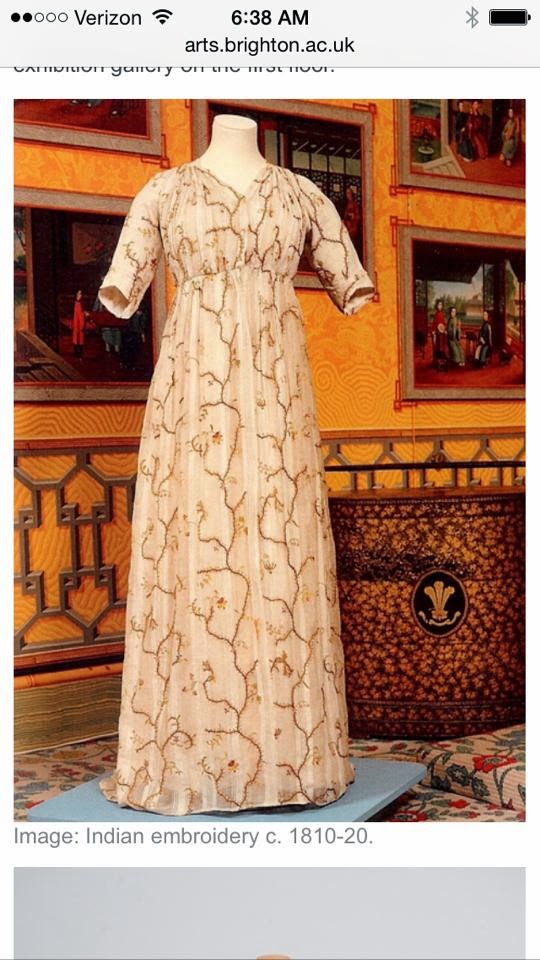
So I jumped online and started asking anyone I knew about this fabric. Then lo', I was sent this image as support for the fabric:


I know it's not EXACTLY the same (the original dress being embroidered) but I think it's close enough. Luckily after finding the fabric, hiding it, having to wait a few days and then going back to the store the fabric was still there to be purchased. There was just over 7 yards, so I grabbed it all.
 
I think I will be using Sense and Sensibility's Cross over bodice dress for this project. But I also really like the neckline of that example photo. Is it a drawstring waist with a V neck? That might be too dangerously close to drafting something myself.
 
I have an event, I have accessories, I even have fabric. Now I just need to sew!

Wednesday, July 16, 2014

Sense & Sensibility Elegant Ladies Closet: (modified) Sari Dress

First of all, let me express my fear of Regency dresses. The first ever costume I made was a Regency dress (Simplicity 4055). Not having any idea of how to read a pattern, or instructions, I was tramazied. I can't fault the pattern (knowing how new to sewing I was) but I was completely scared away from the style.

For some time I was able to avoid Regency clothing. The, slowly but surely, more events popped calling for that style. As my sewing skills progressed I looked at that first dress and knew I could do better now if I gave myself a second chance.

My first step back into the era was for a Christmas party a friend was hosting. Knowing all the effort she was putting into her party, I would not dream of appearing in my old green dress of absolute fail.

I had to find a new pattern to use. Despite being told it's the same thing as the Simplicity pattern, I went with the Sense & Sensibility Elegant Ladies Closet pattern. I LOVE that I could download a pdf (in true form, I started this project much later than I should have. Waiting for a pattern to ship would have lost me much needed time).  S&S is also extremely helpful, and somewhere on her site is a step by step how to with photos. Always a win for me.

I would like to point out that I had access to two of the same saris for this project. I often see people complete a dress with just one. I'm not sure if they draft a pattern themsevles or what. I found I needed two to get all the detail I have at the bottom of my skirt (otherwise only the front would have had the detail, and I was obsessed with having that border go all the way around). I'll be the first to admit it's completely possible to do with only one sari if one knows what they are doing. I need to follow a pattern, and my pattern (and the pattern on the sari) required more yardage than one sari provided.

Super wrinkle time! I must do a better job of photos. I promise to return to this post and update with better images. But I need to get off my butt and back to posting.

TIME: A major fail. I have misplaced my notebook that I was using to keep track of my time. I'm searching high and low for it.

ALTERATIONS: I wanted the cross over bodice, but I didn't want the opening flap going down the front of the skirt. It was just a personal preference. So I had to modify the back to open so I could get in and out of the costume. I wasn't able to raise my arms very high in the dress, and this might be why Or it might just be that it isn't designed for the arms to have as much movement (I can't say for certain, as I changed the pattern). I also had to shorten the overall length of the dress. I'm about 5'3" and was wearing flats. I would have been tripping everywhere if I hadn't. I also lined the dress. My saris were shockingly see through, and even more shocking... I didn't make a shift. I have one, but it's white, long sleeved, and wasn't long enough to cover all that needed to be (anyone would be able to see it stopping at my knees. Then there would have been this band of semi see through fabric, it would have driven me insane). I also thought the white under the burgundry would change the overall look of the color so I just calmed myself down and lined it in some gold slubby silk from Joann's. Is it historically accurate to line a Regency dress? NO CLUE.

EASE OF INSTRUCTIONS: The step by step with photos on the site was a major bonus. If a company offers that I rarely even peek at the instructions sent with the pattern. I imagine the instructions are very similar to the online help.

BONUS: I made a matching turban with left over fabric. Using the tutorial from the Oregon Regency Society, I made "the cap turban". Their tutorial worked wonderfully and really finished off my look. I liked that I could just pop it on my head and not worry about it coming unwound.


Tuesday, May 6, 2014

Fort Fred Adventure!

A few friends and I gathered again for a day of shopping and fun at the annual Fort Frederick 18th Century Market Fair. I didn't make a new dress (I rewore my Period Impressions polonaise), but I changed it up with some new accesories. I wore some mitts given to me by a friend, jewelry from Dames a la Mode, new shoe buckles from American Duchess and  a market basket I wove just for the occassion. To top it all off, the wig I had ordered from the Wigmaker of Colonial Williamsburg was ready.

Here I am at the end of the day. A little tuckered out, but loving it.
 
 
And a back view:
up to no good...

 
My haul from the day: my wig, picked up two large, lovely white male ostrich plumes, a hat blank and a few hat pins. My friend Kat gave me a present of a pocket kit with embroidery! Loves! She knows I have been itching to learn that skill, and saw me eyeing up the kit. I some how left the fair with money.

Monday, April 21, 2014

Liebster Blog Award

I've been nominated!


Which makes me feel very guilty for not updating more often. It's been a very busy few weeks. That feels like a very lame excuse when I see so many people with lots of amazing costumes and updated blogs who I know have just as busy a life as I do.

1. Thank the blogger who nominated you. A big thank you to In the Long Run for this nomination!

2. Nominate 10 other bloggers, and notify them of their award.

I'm going to have to break this rule. I checked and the blogs I would like to nominate, and all have already been so (I'm even newer to blogging than I am to sewing, and my circle of blogs is small). If there's a blog out there you think I should check out, link me! I could really use blogs that have a lot of instructional photos and tips. While I do love looking at the pretty pretty, learning how to make the pretty is usually more useful.

3. Come up with 10 questions you want your nominees to answer.
I haven't nominated anyone, so I can't directly ask anyone these questions. But the following are what I usually ask when I meet someone new. And what I think would be useful for people to tell in their blogs from time to time.
(1) How long have you been sewing?
(2) Are you self taught, or did you go to school for a costuming related field?
(3) What got you interested in costuming?
(4) What is your favorite part about dress up?
(5) Least favorite?
(6) Strangest thing anyone has ever said to you while in costume?
(7) What was your funniest in costume moment?
(8) What is your favorite event to go to?
(9) How many garments a year do you make?
(10) What advice would you give to someone just starting to get interested in costuming?

4. And lastly: Answer the questions you received from the one who nominated you.

I was asked about the story behind my favorite garment that I have made. At first I thought "luckily for me there weren't 10 questions to answer!" Then I thought "crap, I don't have a favorite."

I  do have outfits I like less than others. I was not a fan of my 1860s ballgown. The 1860s was entirely new to me. With time and money as factors, I randomly picked a fabric and made a fairly basic dress. I was not happy. It didn't look bad or incorrect, but I didn't feel comfortable (mentally) in it. I'm not sure if I'll ever go to an 1860s ball again. The ball itself was fun. I might take this as a challenge to try a different dress and see if I can't change my mind. I did like my 1857 day dress, so I don't think that era is entirely on the outs, I just haven't found the right ball gown look for me.

 I don't really have an era or style that I would call "mine." I haven't put something on and thought "this.is.it." That might be why I can't pick a favorite. I'm not sure if it's because I still consider myself new to the whole world of costuming, or if I haven't found the look that speaks most to me. Maybe it's not a sudden realization but years of being drawn to a specific style. 

Each time I have made something, I have learned something new. It's all probably fairly basic, boring skills most people learn early on. But that first "AH HA!" moment of fabric matching, to understanding why the thread of the machine is doing what it's doing, to finally learning why grain lines are important to pay attention to; things like that always show up on a project. And just when I think I've mastered a skill, something new presents itself for me to learn. Once I get the bustle skirt down, I think "what's stopping me from making the bustle cage?" and so on.

Monday, February 10, 2014

worn out!

I haven't really be able to post, because I haven't had much time. I have actually been sewing (!). But the more I think I have a handle on how much time something will take me, I am proven wrong.

February may be a little late to do a costume in review post of my 2013 sewing. The only outfit I did finsieh that I haven't posted a photo of is a Regency evening dress made from burgundy saris complete with matching turban.

2013 complete projects are:
robe a la Francaise
husband's velvet 18th century suit
panniers
polonaise (with bum roll)
18th century officer costume for the husband
Mey Rein Costume (for a friend)
The Burton Dress
hoop skirt
1860's ball gown
1857 day dress
and finally the Regency dress with turban


So 11 projects in 12 months! No too shabby.

So far this year I have made a Dr. Girlfriend costume, a regency bibb front dress, and a pelisse (that I have not finished trimming).

The 3rd Annual Francaise Dinner Party is less than 3 weeks away and I still haven't started that yet (eeek!!!!). Luckily a friend is going to help. I've picked out pink and green as my colors this year. I am going to be a watermelon! My goal for the dinner: at least 1 good photo of myself in my dress.

I have a few goals for this year:
a nice Regency costume for the husband (something less costumey than the officer outfit)
teens era corset
teens era picnic outfit (for when a group of us visit the costume exhibit)
new 18th century stays
a medieval outfit (part of a costume challenge)
17th cenury dress (part of the same costume challenge)
polka dot Victorian dress.

Which is also 11 projects total for 2014 if I don't add anything... weird.

But I probably will.