Sunday, December 22, 2013

Simplicity 3727

This pattern is out of print, unfortunately. But with a little digging around you can snag one for a good price. The major pro of this particular pattern was the directions were AMAZING. I understood exactly what I was being told to do the first time every time. The major con was there was a lot of hand sewing. A LOT. Far more than I expected, and depending on how you trim, a lot that could have been avoided.

My absolute favorite part of this dress is actually the back. It makes me think of later Victorian styles.


Sunday, December 1, 2013

Simplicity 9764

I started my sewing for the 150th Anniversary of Remembrance Day by sewing my very own hoop. I decided to make the hoop myself for a couple of reasons. One of the main reasons was because of all the "lamp shade" skirt warnings that many people said came with the purchased hoop skirts. And my OCD being what it is, I thought it was less trouble to make the skirt than the overwhelming paranoia I would suffer if I purchased one.

I used Simplicity 9764. It seems to be out of print, but it's still fairly recent enough that you can find fairly priced copies on ebay or etsy. I only made view A, which is the actual hoop. I didn't have time to make the petticoat.


 Here's what mine looks like:


Monday, November 25, 2013

why I haven't seen sunlight in weeks

I've (just barely) finished three dresses, and some supporting undergarments all in time for their various events. I'll do write ups later for each outfit, but I figured I would share the photos of the gowns before they are packed away in the closet.

The Burton Dress:
The orange and black could be limiting the time of year I'd wear this. But it won't. Some amazingly odd things happened as I worked this dress (such as shrinking cotton fabric and the ruffles that refused to be made) but it was finished in time. And I've gotten to wear it twice!


 The Mega Hoop:
I took up far more space in these than anything I've ever worn before. I found 1/2 steel for the bones. There were no issues with the hoop opening, but that steel did make it a very heavy garment to wear.


The 1857 Day Dress:
My first ever dress of this era. Deceptively simply looking. Took much longer than anticipated and way more hand sewing than I would have imagined.


And finally, the 1860's Ball Gown:
No lie, I felt like a cake topper the whole time. I was assured the look was period correct.

Monday, October 14, 2013

fitting issues

I've decided to go with TV405 for my bodice. I've made this one before, but having been told it was too long in the waist for me, I've gone about attempting to move the waist up.

My natural waist looked to be about two inches above the waist that was marked on the pattern. For most of the pattern pieces, I was able to redraw the waist line and then just fold the pattern piece to the new spot. However, the back piece presented an issue, since the natural waist was below the fold of the flapy dodads. Asking around, a friend was able to illustrate for me where I needed to remove.

Once I removed that portion, I lined up the curved portion to have the nice smooth curve return.

Now I am working with terror because I changed the pattern. Somehow my lining that I cut out was much shorter than my fashion fabric. I cut out the lining first, so I have no idea how that happened (since the pattern pieces were taped). 

After recutting the lining, I flatlined the pieces together. This time they were the same sizes, but it's somehow like I have air bubbles between the two pieces. I take it to mean that the fabric moved or something when they were attached to one another. Ot that they are somehow slightly different sizes again. I'm tempted to use some sort of iron on adhesive the next time I have to flatline. Maybe cut out the fashion fabric, iron it to the lining fabric, and then cut around to make sure they stay together? Any have any good suggestions?

Anway, time is a factor (I need this done enough for this Saturday). I've started putting the bodice together. And it seems a little big.

It's a little tricky to get a photo of one's own back, but here it is. A better eye than mine told me it looks a little big, so I'm going to try and see if taking in the seams just a but helps (which I will do by basting, to make sure before I have to rip out a bunch of little stitches).


I'm not too sure what to do about this shoulder issue. I think if I remove the seam where it is and take in more fron the front it'll fit more snugly... maybe?


I think life will be a lot easier if I make a duct tape dress form of myself.


I do this for fun, right?

Monday, October 7, 2013

The Burton Dress

I've begun my Halloween party dress. The theme for this year is "black and orange". Joann's had this fun stripe in the quilting fabric section, and I could not pass it up.

The striped fabric does not want to cooperate with the ruffle foot, and somehow the black ruffles ended just a few inches to short, but the striped ruffles had so much extra. But I am make steady progress and I'm enjoying the look so far.

I've got more ruffles to make/add. I need to sew the bustle parts into place. And the entire bodice to do.The skirt has a train which I will be pinning up for the party (being stepped on does get annoying) but will eventually make a dust ruffle to walk about with.


I've started calling it the Burton Dress. It seems fitting.

Tuesday, September 24, 2013

Frankenpattern!

I have been sewing! Just not for me.

A friend of mine likes to go to anime conventions, but doesn't know how to sew. I'm always happy to help when I can, and it does give me the opportunity to try things that are (at times) difficult to do when sewing for oneself (fitting someone else's back is a whole lot easier than fitting my own).

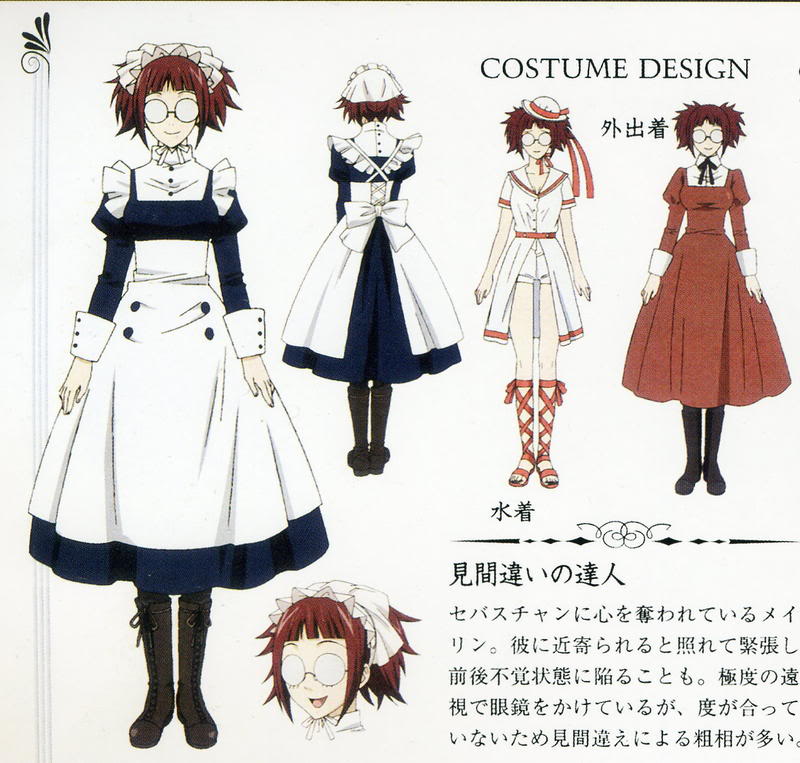
This year I was asked to sew a Mey Rin costume from the show Black Butler. The great thing was that there are ample images of this costume to look at, from all angles. I found this and went from there:


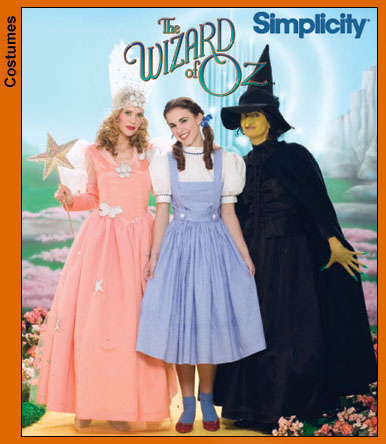
After I found the reference illustrations, I went about researching how other people made their costumes. Someone had used Simplicity 4136 (Dorothy from the Wizard of Oz) and modified it as they went.

 I'm not a huge fan of "modify as I go" work. I thought the white blouse of 4136 was perfect (except the zipper back), but the blue dress portion needed something else.

I can't say exactly what it is about the Dorothy dress portion I didn't like. I looked around other Simplicity patterns hoping I could find something else to use.


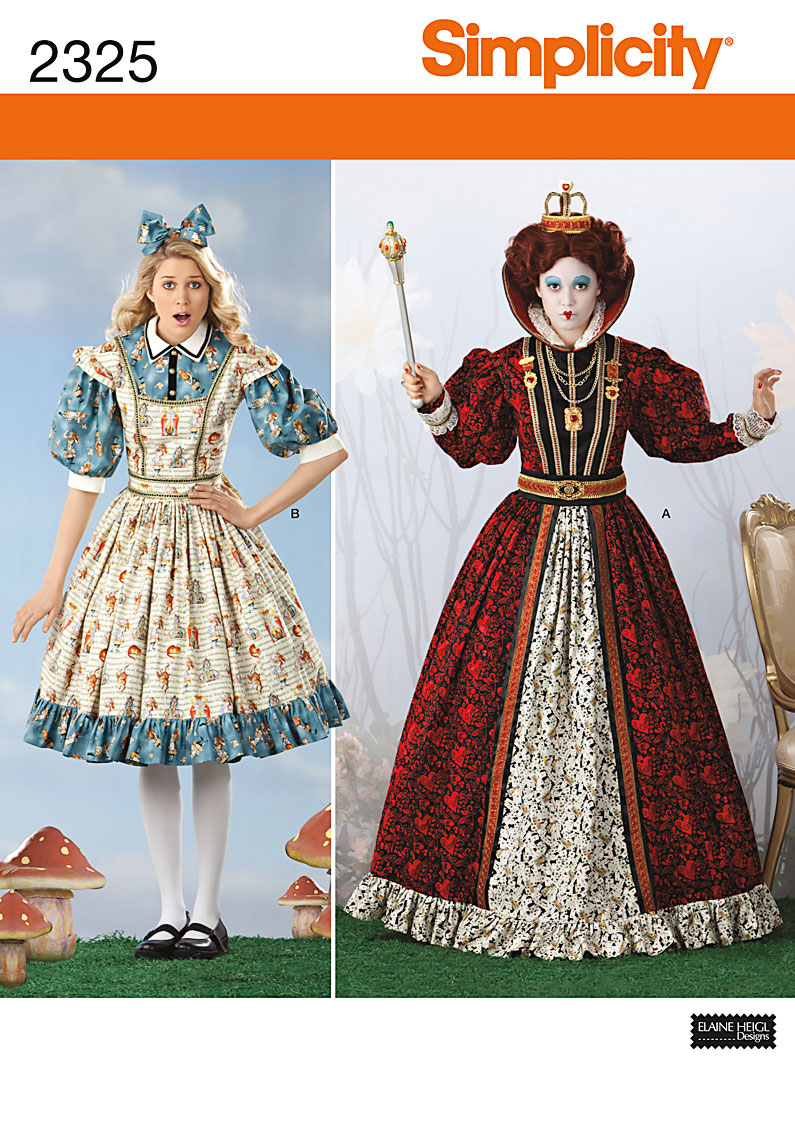
What should catch my eye, but Simplicity 2325. Alice's dress semed to have it. The overdress (that is, the white portion that looks sort of like an apron) was just right. Except for that ruffle. Luckily I had picked up the pattern during a 5 for $5 sale, and after checking out the skirt pannel, I learned I could adjust the length and not add the ruffle. Yay!

However, both the patterns lacked the right sleeves. Again, a lot of people who went before me (and have infinitely more skill than I) said they just modified the sleeves.

I've never modified sleeves before. And I wasn't sure if adding a tube was the way to do (what with the need for elbow movement).

Back on the hunt I went. I was feeling fustrated, and shared my lack of sleeve success to a friend. Who just happened to think Butterick 3417 was just perfect.


View A was just right, and I could use those flappy shoulder things for the white portion of the apron as well! You'll notice on the illustration the white around the sleeves doesn't connect with the lower portion of the apron. What I did to create that was use the pattern peice, but I added a long strap to it at one end to connect with the back of the apron to give it the anime look.

I was a little nervous about using a non Simplicity pattern. I wasn't sure if the sleeves would line up to the bodice correctly. It look a little wiggling, but they managed to go on and fit very comfortably.

I changed everything to be a button up (as I think zippers RUIN the look). I had to make my own cuffs and hat. The cuffs I cannot explain to anyone. There are pilgrim lady patterns out there that could be used if making you own terrifies you as much as it did me. The hat was a square of fabric, gathered about two inches from the front, and then I attached a strap. Veyr easy!


Here's my Mey Rin!


At this point you might be saying: what the hell? You missed the white apron part! What did you use for that? I have to admit I just made a long white regangle to go around the waist. And the a triangle with the top chopped off for the bottom portion. I draped it on my dress form as best as I could and pinned and marked away. I hated not having a pattern piece for it.

When I get the chance I'll get a photo of the back when it's worn. I also should mention a pettiocat is needed or the skirt looks completely deflated. You can get them for about $20 on ebay.

I failed at keeping track of my time for this project. :(


Sunday, June 9, 2013

Decisons, decisions, decisions.....

I've been having a horrible time of trying to pick out my next project to work on. I don't really have an era of look that I could point to and say "this is so me." I go to a lot of different themed events, not all historical. I like costumes from movies I know aren't accurate. My body type works very well for the 1920s. I have my one '20s dress that I love, but not enough to expand to a full wardrobe.

I have several projects I've been in and out of love with. Mostly because I see a new pattern and go "o0o0o0o0ooo0ooo!!!!!" and then completely switch gears. My latest out of nowhere decision was to pick up a copy of Simplicity 3791. It's a very close version to a dress at the MET.


      vs.


(admit it, you can't even tell which one is labeled Simplicity!)


The trouble is. I've never really like the big hoop era. But a friend is going to Remembrance Day in Gettysburg, and that sounds super fun. I'll be going, and since I respect a theme, I need to have a dress. But this dress does not say practical November clothing. I bought it anyway. I'm sure I'll find something that says cold weather resistant. And I have lots of teal wool sitting around. Did they have teal wool then?


Of course all of this takes away from a Victorian mourning dress I've been wanting to make for a "theatrical seance" I'm going to in August. And the Anne Boleyn dress I purchased green velvet for last December. And the 1920s day dress I wanted to make if I plan to return to the Jazz Age Lawn party on Governor's Island in NY in August.......


Uh.... help?

Thursday, June 6, 2013

photos!

This past weekend was the Dress U Conference held in Frazer, PA. I didn't make anything new for the event (money and motivation being the main issues). But I did manage to get a photo or two of outfits I have made while having this blog!

The first is of my 18th century polonaise. I wore it to the Friday Welcome Reception. It was very comfortable considering we were outside, and it was fairly humid and probably in the high 80s. Had I been wearing anything to constricting and I may well have fainted in horror at SewLoud, who clearly did not get the dress 18th century memo.
Thanks to In The Long Run for the photo!

This second photo is of my robe a la francaise. It came from my own camera, so who knows who actually took the photo. Alas, it wasn't on the proper setting for such an oddly illuminated area. But you can see it's on me, and glory in my massive wig of poof.

(you can also find the bathrooms!)

Monday, May 6, 2013

Period Impressions: 1770 Polonaise & Petticoat

I'm way behind on posting about this costume. It seems like every weekend in sight has a costume requirement. Luckily it's a 1920's weekend on the way, and I am covered. So I finally have a chance to not sew, and share a creation or two.

This is my first try at a more "historically accurate" pattern. All the instructions on one page. No zippers. The phrase "to be an accurate reproduction this garment should be totally hand sewn" on it. I was fairly terrified.

So here's my try at Period Impressions 1770 Polonaise and Petticoat:


Thursday, April 4, 2013

Very Inspiring Blogger Award

A very big thank you to Lauren R for giving me this award!

To accept this award, I have to:
(1) display the link of the person who nominated me
(2) state 7 facts about myself
(3) nominate 15 bloggers for the award
(4) tell them I've nominated them

Some things you may not know about me:
(1) I'm right handed, but use my left hand when using an adding machine, calculator, or using a MAC machine
(2) I'm absolutely terrifed of cephalopods. Sharks in the water? Fine. Squid the size of my pinky finger? Hell no.
(3) I've taken a ride on the fastest elevator in the world.
(4) My husband is the one who got me into costuming.
(5) I can eat a 5 pound bag of gummy bears in one sitting.
(6) I hate real bananas, but love banana flavored candy.
(7) I can only nap on sofas.


15 blogs that have really inspiried me:
A Dedicated Follower of Fashion - there is no era she does not look good in
Before the Automobile - I dream of the day I make something that looks 1/2 as good as her work
Bridges on the Body - anyone who can make me less afraid of making a corset is amazing
Diary of a Mantua Maker - love her steampunk (that's how it's done!)
Festive Attyre - as someone with costume ADHD, I love her range
JennLaFleur - nice as can be and her step by step photos? fitting advice? priceless
Madame Modiste Historic Costuming - *always* a blast to go to an event with and her encouraging words have gotten me where I am
In the Long Run - her outfits always look perfect
One Delightful Day - yum to everything. YUM 
The Costumer's Closet - helps me understand choosing fabric like no one
The Tea Drunk Taylor - I love to see the mens wear get love
The Fashionable Past - not afraid to be bold, and making it look damn good!
Truly Victorian - I wasn't sure if this counted as a blog, but anyone who can make a blouse from a table cloth, and make it so well, inspires me
Historical Sewing - so many useful tips!
The Dreamstress - explains things with photos (a total win)


Saturday, March 30, 2013

Simplicity's Panniers (or, make your own tent)

Simplicity 3635 is the companion undergarment pattern for the robe à la Française dress. Just a warning: they are big. If you plan to maneuver through tight spaces, these may not be the support structure you are looking for. While they are flexible, they are also wide.

Taken in front of my closet: the panniers
are almost blocking both of the folding doors.

The dress form doesn't hold the panniers up as well as actual human hips. I do have a goal to become a better costume photographer. But posts without photos aren't ideal for a visual learner like me.

TIME: This project took me approximately 10 hours. I wasn't expecting it to take so long, but as I got into it, I decided to finish my seams. I cannot explain what made me think this was a good idea. But it certainly added to my overall time total.

Gaze upon my not so lovely finished seams.
And know it was madness that I suffered.


ALTERATIONS: I couldn't find any 1/2 inch wide boning that the pattern called for. If anyone knows where to get some, please let me know. I used 7/16" wide hoop boning from Corset Making. It was what I could find and it worked, but I *think* the 1/2 inch stuff would have worked better (it might be what has caused the scrunching around the boning). Originally I had planned to make it so I could remove the bones for washing (if something can get stained, I will stain it). But at the draping party, we discovered that the bones were slipping on one hip, which made the hem line 2 inches higher on one side than the other. NOT GOOD. I went back and sealed the seams shut, and will most likely just hand wash this in the tub if it needs it.

It seems to me that you should plan a way to trim over where the bottom bone is on your fashion petticoat. It may have been that my fashion fabric was very thin, but the bone line was slightly visible (at least to me) until I placed my trim on. Something like that drives me a little bonkers.


EASE OF INSTRUCTIONS: I don't have any notes written down of steps that caused me any real trouble. The pieces are pretty basic shapes, which helps. Laying the casing for the boning was a bit of an event, but lots of pins and markings make it possible.

STORAGE IDEA: These things are big. And my space is limited. So a plan to store this garment was necessary. I saw a photo of someone who uses these as a lamp shade (when not being worn) which was pretty neat, but not possible for me. My solution was to get a long garment bag (not the suit ones, they're too short), and store the collapsed panniers in the bag. Now they're only as wide as the bag allows. And no opening unexpectedly.

Thursday, March 21, 2013

Simplicity's Robe à la Française

Wow! The 2013 Francaise Dinner party has come and gone! Within it's very short history, it has become one of my favorite events.

This year I was a co-host, and I really wanted to sew for it. I faced a lot of challenges including:
- feeling totally incapable of choosing a fabric
- having to make the supportive undergarments as well as the dress
- deciding I wanted to make my husband a costume for the event
-  not really starting to sew until the end of January, knowing full well the event was at the beginning of March
- managing the details of the event
- working a full time job

The patterns I used were Simplicity 3637 and 3635. These particular patterns don't seem to be in print anymore but can still be found on ebay and etsy. I picked them up when Joann's was having a 5 for $5 sale.

I will admit I am afraid of more historically correct patterns. I'm terrified that I'll buy one and the directions will read something along the lines of: (1) cut out fabric (2) sew together (3) wear. As my first ever Robe à la Française (I feel the *need* to type the name fancy like that) I thought Simplicity was right up my alley.

So here she is, in all her wrinkled glory (the dress may or may have not been living as a heap on my floor for some time):


It doesn't fit so well on my dress form (apparently her right boob is bigger than her left...) and I'm a little taller, but it's impossible to take a self portrait in this, and I managed to get no really good shot of me the whole evening.

The more down and dirty about the dress behind the jump.

Monday, March 11, 2013

2013 Francaise Dinner Party

It is so hard to believe it, but the Francaise Dinner party has come and gone! I cannot get over how absolutely wonderful everyone looked. Why must these things end? Stupid reality.

This year was the second year we held the dinner, but we moved to the General Warren Inne. I cannot express how thrilled I was with them. The atmosphere was ideal, the food was divine, and the staff! Not only highly helpful and professional, but they were so interested in the event and the fashions. I can only hope we have lured more people into the world of dress up. Even the rooms many of us rented for the evening were perfect.

I was able to finish both my costume and my husband's, and there will be a write up of the time it took to compelte each. Two costumes in (approximately) less than two months was extremely difficult.


I fear I have to become a better photographer at events, because a great many of my photos turned out terribe. But here is the group shot!


Tuesday, February 19, 2013

I've been sewing, I swear! I just haven't been updating. So far this year I have finished hip panniers and a Regency shift. I'm in what I hope to be the end stages of my robe à la française.

Here's my current status. No sleeves, it's too long, and still needs trim. But progress nonetheless. No more horrible nightmares of having nothing to wear.


I have been keeping track of how many hours each project has taken me, and will write them each up. But that will have to wait until after March 9th. Because this, another dress, and the husband's in the works costume all need to be completed by then.

Plus all the party stuff.